Honda CR-V: Changing the Home Screen Icon Layout / Wallpaper Setup
You can change, store, and delete the wallpaper on the audio/information screen.
Import wallpaper
You can import up to five images, one at a time, for wallpaper from a USB flash drive.
- Connect the USB flash drive to the USB port.
- Select Settings.
- Select Clock.
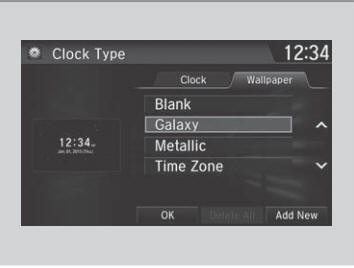
- Select Clock/Wallpaper Type, select Next, then open the Wallpaper tab.
- Select Add New.
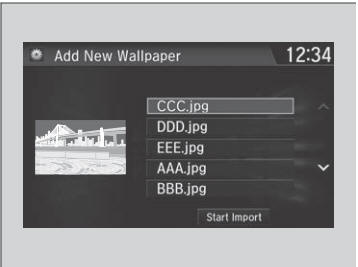
- The picture name is displayed on the list.
- Select a desired picture.
- The preview is displayed on the left side on the screen.
- Select Start Import to save the data.
- The display will return to the wallpaper list.
The wallpaper you set up on Clock/Wallpaper Type cannot be displayed on the driver information interface.
- When importing wallpaper files, the image must be in the USB flash drive’s root directory. Images in a folder cannot be imported.
- The file name must be fewer than 64 characters.
- The file format of the image that can be imported is BMP (bmp) or JPEG (jpg).
- The individual file size limit is 5 MB.
- The maximum image size is 4,096 × 4,096 pixels. If the image size is less than 800 × 480 pixels, the image is displayed in the middle of the screen with the extra area appearing in black.
- If the USB flash drive does not have any pictures, the No files detected message appears.
After changing the screen interface design, you can change the wallpaper by following procedure.
- Select
 .
. - Select
 .
. - Select and hold empty space on the home screen. The pop-up menu appears on the screen.
- Select Change wallpaper.
- Select Gallery, Live wallpapers, or Wallpapers.
Select wallpaper
- Select Settings.
- Select Clock.
- Select Clock/Wallpaper Type, select Next, then open the
Wallpaper tab.
- The screen changes to the wallpaper list.
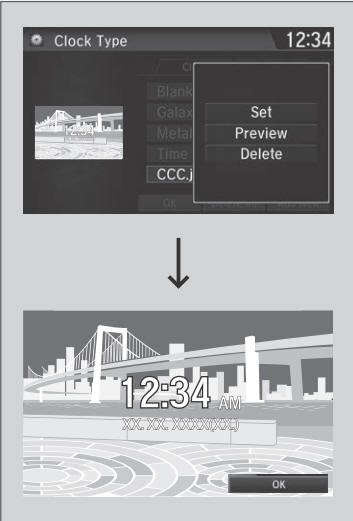
- Select a desired wallpaper.
- The preview is displayed on the left side on the screen.
- The pop-up menu appears on the screen.
- Select Set.
- The display will return to the wallpaper list.
To view wallpaper once it is set
- Select
 .
. - Select Info.
- Select MENU.
- Select Clock/Wallpaper.
Delete wallpaper
- Select Settings.
- Select Clock.
- Select Clock/Wallpaper Type, select Next, then open the
Wallpaper tab.
- The screen changes to the wallpaper list.
- Select a wallpaper that you want to delete.
- The preview is displayed on the left side on the screen.
- The pop-up menu appears on the screen.
- Select Delete.
- A confirmation message appears on the screen.
- Select Yes to delete completely.
- The display will return to the wallpaper list.
From the pop-up menu, select Preview to see a preview at full-size screen.
To go back to the previous screen, select OK, or select
 .
.
When the file size is large, it takes a while to be previewed.
To delete all wallpapers you add, select Delete All, then Yes.
 Customizing the Meter
You can edit, add, or delete the meter contents on the driver information
interface.
Settings
System
Configuration of Instrument Panel
You can store up to three customized configurations...
 Home Screen
To change to a next screen
Selecting or , or
swiping the screen left or right
changes to the next screen.
The home screen has 5 pages (fixed). You cannot add any more pages...
Other information:
Honda CR-V 2017-2025 Owner's Manual: If the Low Tire Pressure/TPMS Indicator Comes On or Blinks
Reasons for the indicator to come on or blink A tire pressure is significantly low, or the TPMS has not been calibrated. If there is a problem with the TPMS or the compact spare tire is installed, the indicator blinks for about one minute, and then stays on...
Honda CR-V 2017-2025 Owner's Manual: Childproof Door Locks
The childproof door locks prevent the rear doors from being opened from the inside regardless of the position of the lock tab. Setting the Childproof Door Locks Slide the lever in the rear door to the lock position, and close the door. When opening the door Open the door using the outside door handle...
Categories
- Manuals Home
- Honda CR-V Owners Manual
- Honda CR-V Service Manual
- Quick Reference Guide
- Wallpaper Setup
- Front Sensor Camera
- New on site
- Most important about car
Advanced Airbags
The airbags have advanced features to help reduce the likelihood of airbag related injuries to smaller occupants.
The driver's advanced airbag system includes a seat position sensor.
